Monthly Rambling: Boardgames I’ve Made An Insert For

The last time I made any reference to how I organize my boardgames was back in the very beginning in 2010 in this post. I actually still use those plastic jelly cups though I am close to running out, but I have expanded my organization skills to include DIY foamcore insert building and here are the ones I decided to do inserts for:
 THE INGREDIENTS
So it turns out that building a foamcore insert only requires a few tools, namely: foamcore board (which I can only find in Art Friend in The Gardens Mall, Mid Valley it seems), a good cutter blade (I find steady more important than sharp), a steel ruler, PVA white glue , a notebook and pen to record measurements, ball head dressmaker pins (not pictured) and most importantly, the ability to think spatially.
 #1 – DUNGEON PETZ
Dungeon Petz had a fair bit of cover lift because the plastic jelly cups, whilst useful as both a storage and setup solution, does results in some wasted space. What I really wanted to try was making a card tray for the different needs cards and this was a successful venture. My first project did come with some errors as expected, where I had to trim down the insert wall for the cages (bottom left of picture). Still, this was good enough that I didn’t feel that I needed to redo it. An important lesson I learnt from my first experience was that my foamcore was 6mm thick and not 5mm thick, you will be surprised that this small variance matters greatly.
 #2 – GLASS ROAD
It really cheesed me off that I couldn't get the cover of Glass Road to be flush against the base, largely because of the unwieldy production wheels (one for each player). This was also an interesting insert design without outer walls to save on space which I took inspiration from bgg user brentont. I realized that boardgamegeek users do post some really good designs online and this was back before the plethora of insert designers like Broken Token, Folded Space, Laserox and so on.
 #3 – EUPHORIA: BUILD A BETTER DYSTOPIA
This was my first project that incorporated both a foamcore insert and the plastic jelly cups. It seems to be a trend that if a boardgame has either (a) cards or (b) covers not flush with its base, it is getting a foamcore insert. I did sell off Euphoria eventually and had to think for a bit whether I wanted to build in the cost of the insert into my selling price. I decided against it in the end, thinking my insert is not that professional looking and included it as a bonus for the new owner instead.
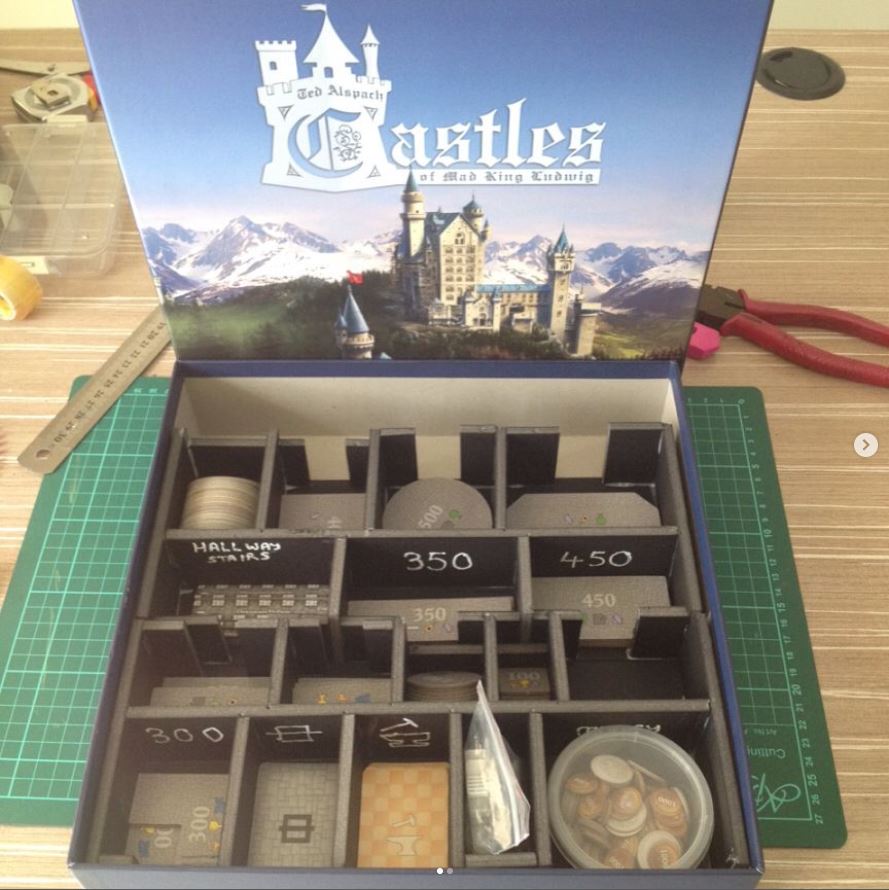 #4 – CASTLES OF MAD KING LUDWIG
I absolutely loved this insert. Castles of Mad King Ludwig has a higher setup time because of all the different room tile sizes and having this portable room tile holder saves a tremendous amount of time and made the game much more playable. I even budgeted space for the Secrets expansion but I went for the Collector’s Edition in the end. I love this insert so much that I have not decided to sell my base copy and it is now sitting in the school’s library.
 #5 – RACE FOR THE GALAXY
Race For The Galaxy has so many different bits and pieces from all the different expansions that opening the box always looks like I’m staring into a chaotic cosmos. This was also my first attempt at some form of a card shoe but unfortunately, I mismeasured the incline of the deck so the cards do stick out a little bit above the shoe. The multi layered trays (in the middle) for the tokens ended up working very well and is my first insert within another insert. Baby steps!
 #6 – YOKOHAMA DELUXE
My most precise insert yet for a publisher that brings back a lot of nostalgia. I realize that those who were affected by Tasty Minstrel Games’ last days are probably still upset but TMG’s games brought a lot of joy into my boardgaming life and set a very high bar for boardgame quality. In hindsight, Yokohama Deluxe probably did not need an insert and would have been better served with custom deck boxes but colour printing was still an expensive proposition to me at the time.
 #7 – SUSHI GO PARTY!
At the time I told myself that some publishers need to attend insert design courses when their game comes with an insert that does not fit sleeved cards, and Sushi Go Party! was one of these games. Now I don’t religiously sleeve all my boardgames, but when you lose a card and have to proxy a replacement which tends to happen to party games, sleeves would then become necessary so that the proxy is not so obvious.
 #8 – NATIONS
I really love this card tray and the crazy thing is that it still fit the box despite me forgetting to measure its length. The cards were too long standing up so I turned them on their side and somehow the 4 ages and events deck managed to fit just right. My drawing skills still leave a lot to be desired though…
 #9 – PATCHISTORY
The only boardgame that serves as the black mark in my hobbyist history – as the only game to have entered my collection and left without a single play. One of the reasons I made the insert was also to encourage myself to bring this beast to the table but ultimately the difficult ruleset and poor 2 player gameplay did me in. One thing I really didn’t like about this insert was the long strip for victory point tokens. I could have made the cube storages smaller and placed the victory point storage in a square shaped hole instead. I definitely did not price the insert into my selling price when I sold this baby.
 #10 – ROLL PLAYER
This was the first insert I based off a commercially available design. There were things I could not do like the original so the dice for Roll Player are still kept in a separate bag outside of the boardgame box. The only project to date that could not accomplish the objective despite the number of ways I approached the design. One of the innovations in design was the pocket for small cards in a normal card tray lying on its side (picture in the middle left for the big bosses from the Monsters & Mininos expansion. I also realized that although the standard measurement for foamcore thickness is 5mm, mine is 6mm resulting in the cards sticking out a little bit that you can see in the picture.
 #11 – PALADINS OF THE WEST KINGDOM
This turned out to be the most precise insert I have made to date. Paladins Of The West Kingdom comes chock full of goodness with no breathing space at all. The only thing I did not like about the design was the coins and provisions storage well which made it difficult to dig for the resources you needed but every millimetre of space counted. This all came to naught when I ordered the Collector’s Box to fit the City Of Crowns expansion.
 #12 – TERRAFORMING MARS
Another attempt at a card shoe insert which did not go to plan. Measuring a card deck in an inclined position is surprisingly difficult because you need to get the length and height just right otherwise the cards will stick out of the top of the insert.
 #13 – SMASH UP
I already had two expansions for Smash Up when I picked up Smash Up Marvel. So I created a slightly upgraded version of the Sushi Go Party! insert and voila, just enough room for everything I had. Admittedly I had forgotten about my custom base mats but they are pretty thin so the difference amounted to very little.
 #14 – LOST RUINS OF ARNAK
One of my proudest achievements. 4 hours of work and it looks as good as something I would get from the store. The only crazy thing about it is the storage only works in exactly this configuration. It takes me a minute after playing each time to figure out how it goes back together again. I probably need to number the trays or something. This is really the first insert I would pay money for.
 #15 – ARK NOVA
Finally! A foamcore card shoe that is not correct in its measurements but also correct in its utility.
And that is all the foamcore projects I have undertaken since 2017 which feels like an age ago but really isn’t. DIY inserts are not as daunting as they seem and I have seen some who can even do designs that have interlocking sections that do not require any glue. It just requires a little patience and a little effort, and can save you anywhere between RM50 – RM100.
Until next time, keep calm and play better.
No comments:
Post a Comment